
Moon shot photography always begins with expectation. The Moon looks dramatic in the sky, especially during moments when space missions like Artemis II put it back into headlines. You raise your iPhone, tap the shutter, and what appears on screen is often a bright white circle without detail. The difference between what the eye sees and what the camera records comes down to exposure behavior and focal distance.
An iPhone camera is designed to balance scenes automatically. At night, it assumes most of the frame is dark and tries to brighten everything. The Moon, however, is illuminated directly by sunlight and is much brighter than its surroundings. That contrast confuses auto-exposure systems, which is why intentional adjustment is essential for a proper moon shot.
Why the Moon Is Hard to Photograph
The Moon is not just distant; it is also a high-contrast subject. Against a black sky, it becomes the brightest element in the frame. When exposure is increased to capture the dark background, the lunar surface loses texture. Craters and shadows flatten into a glowing disk.
Understanding this dynamic is the first step. A moon shot is less about adding light and more about reducing it. Instead of boosting brightness, the goal is to preserve highlight detail.
Controlling Exposure Manually
To prevent overexposure:
Open Camera > Tap on the Moon > Drag the exposure slider down
Lowering exposure darkens the sky but protects the Moon’s surface detail. The image may initially look underexposed overall, but editing later can rebalance shadows without destroying highlights.
This small adjustment often transforms the result. Surface textures become visible. The edge of the Moon appears sharper.


Choosing the Right Lens and Zoom
On iPhone Pro models, the telephoto lens delivers better moon shot results than digital zoom. Optical zoom maintains clarity because it uses dedicated lens hardware rather than cropping the sensor image.
Avoid pushing digital zoom beyond the optical limit. Instead, capture at the highest optical zoom setting and crop carefully during editing. Excessive digital magnification reduces sharpness and exaggerates noise.
If your iPhone model lacks a telephoto lens, stabilize the device carefully and rely on exposure reduction rather than zooming excessively.
Stability Makes the Difference
Even minor movement affects a moon shot. The Moon may look still, but at long focal lengths, small hand tremors soften detail.
To improve stability:
- Use a tripod
- Rest the phone against a fixed surface
- Enable the timer
Open Camera > Set Timer (3s or 10s)
Using the timer prevents movement from tapping the shutter button. For longer exposures, stabilization becomes even more important.
When to Use Night Mode
Night mode activates automatically in low-light environments. For moon shot photography focused solely on the Moon, long exposure is often unnecessary because the subject is already bright.
If Night mode activates:
Open Camera > Tap Night Mode icon > Reduce exposure time
Shorter exposures preserve sharpness and prevent blur. For wider compositions that include buildings or landscape elements, increasing exposure time can help balance foreground detail while maintaining lunar clarity.
Capturing the Night Sky Beyond the Moon
Photographing stars requires a different strategy. Unlike the Moon, stars are faint. Here, longer exposures become useful.
For night sky photography:
Open Camera > Mount on tripod > Activate Night Mode > Increase exposure duration
Choose the longest exposure time available when the phone is fully stabilized. In areas far from city lights, longer exposures reveal more stars and faint constellations.
Light pollution significantly affects results. Moving away from urban areas dramatically improves clarity.
Composing With Foreground Elements
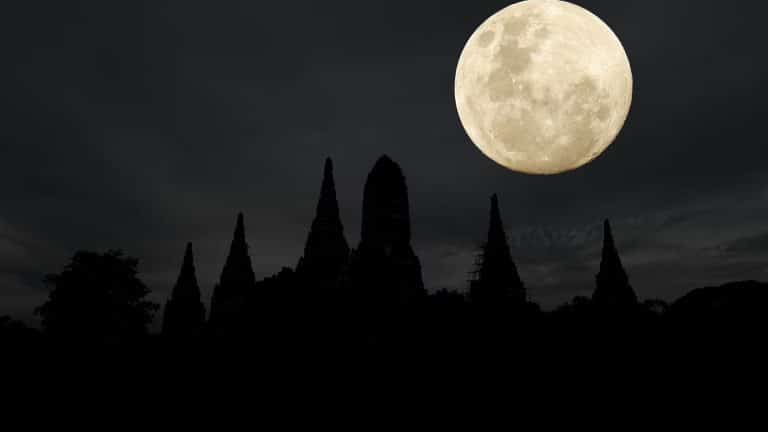
A moon shot does not need to isolate the Moon against empty space. Including architectural lines, trees, or landscapes adds scale and storytelling value.
For example, aligning the Moon above a skyline or framing it between structures creates depth. Silhouettes work well because they remain dark while the Moon retains detail. This contrast adds visual interest.
Events like Artemis II encourage people to look up, but thoughtful framing transforms a simple snapshot into a compelling image.
Editing to Refine Detail
After capturing your moon shot, subtle editing enhances clarity.
Open Photos > Edit > Adjust highlights, contrast, and definition
Reducing highlights further restores texture. Increasing definition sharpens visible craters. Avoid overprocessing, which can introduce artificial halos around the Moon’s edge.
Shooting in formats that preserve more data, such as ProRAW on supported devices, provides greater flexibility during editing.
Understanding Limitations
Smartphone cameras have physical constraints. The Moon occupies a small portion of the frame, even with telephoto lenses. Professional astrophotography equipment uses long focal lengths and specialized mounts.
However, modern iPhones combine sensor quality with computational photography. With proper technique, a detailed moon shot is possible without additional hardware.
Moon shot photography with iPhone is about exposure discipline, stability, and composition. By reducing brightness rather than increasing it, stabilizing the device, and using Night mode strategically, you can capture lunar detail and night sky scenes that reflect what your eyes see when you pause and look upward.